


Breaker Blocks in Trading: Explained


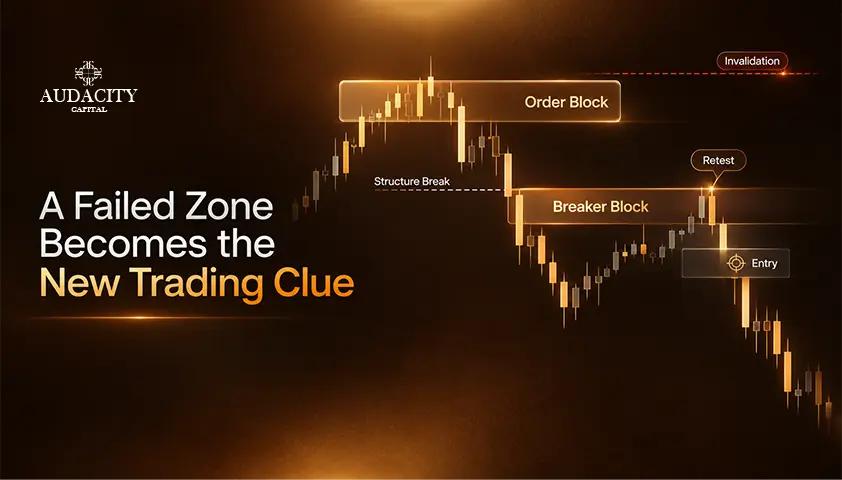
A breaker block is a failed order block. Once price sweeps the liquidity and shifts market structure, the broken zone can turn around and become a possible entry point when price retests it.
Former resistance becomes support. Former support becomes resistance.
Using the term "broken order block" is only part of the story. The strict ICT version also demands a liquidity sweep and a market structure change.
This article clarifies the definition.
You will understand how a breaker forms, what makes them different from order blocks or mitigation blocks, and how bullish and bearish breakers function differently.
The concept of retest entries, risk, and limitations will also be discussed. So let’s get started.
What a Breaker Block Is?
A breaker block represents an invalid order block that reverses polarity after price action sweeps liquidity and changes structure.
If price reverses back into the area, then traders will monitor how the market reacts according to the new direction.
The term was established by Michael Huddleston in his Inner Circle Trader course. It falls within the larger set of Smart Money Concepts (SMC). It expands on ideas presented in order blocks.
If a trader does not understand order blocks, then they won’t be able to spot breaker blocks. If the basic concept is still not clear, study the concept of order-block mechanics first.
The important aspect is the role reversal. If a bearish order block fails, it becomes a bullish breaker block; former resistance now acts as support. When a bullish order block fails, it turns into a bearish breaker, and former support becomes resistance.
This switch in polarity and its validation through the sweep and reversal sets apart a breaker from any other level that broke.
Breaker Block vs Order Block vs Mitigation Block (The Distinction Most Pages Blur)
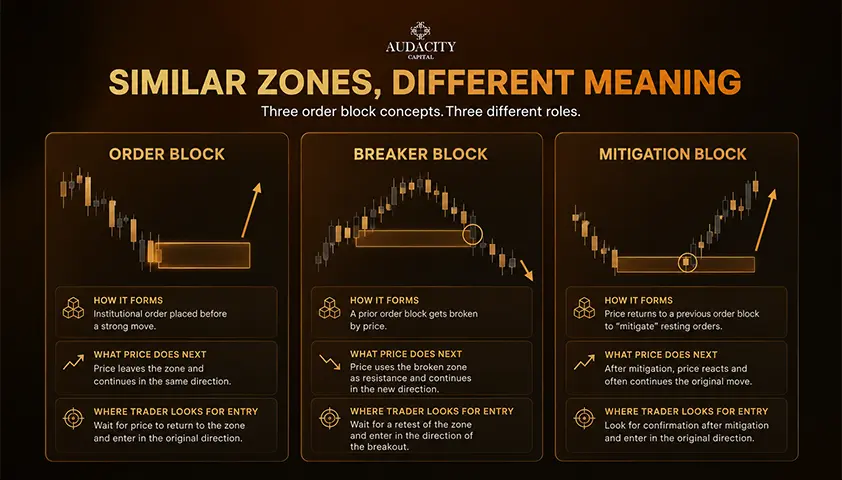
Labeling a breaker “a broken order block” is something that many people tend to do wrongly. There's more to it, and failing to mention the definitions used here makes a big difference because not all broken order blocks are breakers.
1. Order block.
An order block describes the final opposite candle preceding a structural breakdown impulse move. A bullish order block describes the last downtrend candle before the impulse uptrend.
A bearish order block refers to the last higher candle prior to a strong decline. It refers to the area where a reaction forms in line with the initial trend impulse.
In simpler terms, an order block means entering the market with the initial impulse move.
2. Breaker block.
A breaker block describes an order block failure that results in reversal polarity after a liquidity sweep and change of market structure. If you follow the strict definition of ICT used in this guide, both must apply.
The price sweeps away liquidity, breaches the order block, and shifts market structure in the new trend. The broken area can then serve as the retest area for a trade.
3. Mitigation block.
A mitigation block is a failed order block where prices return into the zone in order to mitigate prior positions. This does not feature the defining liquidity sweep method to determine a strict ICT breaker.
Terminology varies across educators, so define the version you are using and apply it consistently.
A broken level without a proper liquidity sweep or structure change cannot qualify as a breaker block. It is basically a broken level or other price-action zone.
How a Breaker Block Forms?
The setup can be identified by following five steps on the chart.
1. An order block is created: The last opposite candle before an impulsive move that creates a break of structure (BOS).
2. Price is running in the opposite direction, sweeping liquidity: A swing high or low where stops rest gets taken out.
3. Order block is broken: Price breaks outside the zone and does not reverse in the zone. This is the "breaker" event.
4. Market structure shifts: The flip is confirmed by either a BOS or a change of character (CHoCH) in the new direction.
5. Price bounces back to the broken area: That zone is now the breaker block and the retest is the trade location.
The SMC logic is that the sweep is going to fill bigger orders around the trapped retail stops. The retrace then provides those participants with a chance to re-enter, which may help explain why the flipped zone can hold on the return.
This is an interpretation and not a factual statement.
Charts do not prove any of this because candles don't tell who traded or the reasons behind the trade. This is the story behind the formation of this pattern but does not prove anything about institutional activity.
If neither exists, we simply have an invalid breakout.
Bullish and Bearish Breaker Blocks
Bullish Breaker Block
A bullish breaker appears if a bearish order block fails following a price sweep of sell-side liquidity. Price changes its structural direction upward making the broken area the new support level.
Retracement to this area can be used as a place for entering long positions, with invalidation below the zone.
Bearish Breaker Block
A bearish breaker appears if a bullish order block fails after sweeping the buy-side liquidity. Price changes its structural direction downward making the broken area the new resistance level.
Retracement to this area can be used as a place for entering short positions, with invalidation above the zone.
A breaker is a reversal pattern, while the retest entry reflects new structure. That is why some sources describe it as a reversal setup while other sources consider it a continuation setup.
It all depends on the leg you describe.
How to Trade a Breaker Block?
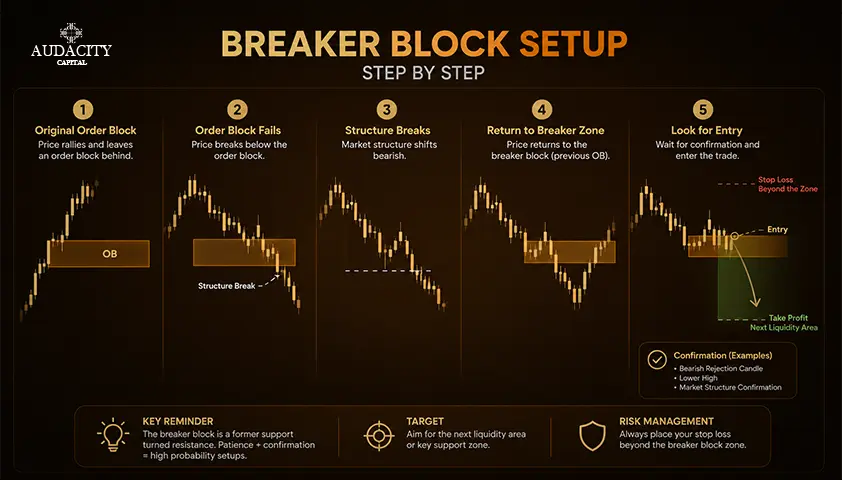
Let the two conditions develop and price pullback into the zone. Only enter if your desired confirmation appears, with any invalidation outside the zone. Do not enter on the break itself. The signal is the retest, not the failure.
1. Entry
Wait for price to pull back into the breaker block zone. Some traders seek confirmation in a lower timeframe such as a CHoCH within the zone, a clear rejection, or an FVG formation on the way up. Some traders enter with a limit order in the zone, and others enter on a confirmation candle. Neither way is any better than the other.
2. Stop loss placement
Beyond the far side of the breaker zone. Below the zone on a bullish breaker, above it on a bearish breaker. In case the price closes through the breaker zone in the wrong direction, the setup has failed. That is different from normal noise within the level.
3. Targets
Targets can be the next pool of liquidity, an opposing order block or any previous swing point. Establish your reward-to-risk ratio prior to entering. The exact numbers will be arbitrary, so consider the target levels as examples for testing.
Some possible sources of confluence which may add to the quality of the setup are:
- Higher timeframe bias.
- Clean sweep of liquidity before the shift.
- FVG within the breaker zone.
- Context of premium or discount, such as selling in premium or buying in discount.
Adding more confluence usually filters out more setups, but it does not guarantee better results.
Nothing in this section is a formula for a winning trade. Breaker block trading is discretionary, and the setup fails regularly. Backtest your own rules on your own markets, pre-define invalidation, and size positions so a losing streak does not end your account.
Common Mistakes and Limitations
The mistakes cluster around the same theme: dropping the conditions that make a breaker valid.
- Calling any broken level a breaker without the liquidity sweep and structure shift.
- Confusing a breaker with a mitigation block and entering setups that never met the ICT criteria.
- Entering on the break itself instead of waiting for the retest.
- Drawing the zone off the wrong candle because the underlying order block was misidentified.
- Ignoring higher-timeframe bias and taking counter-trend breakers on a lower timeframe with no context.
There are also important limitations. Breaker blocks are discretionary and subjective. Two experienced traders can mark different zones on the same chart. Definitions also vary across educators, so “breaker” does not point to one universally fixed object.
The concept is easy to see in hindsight but harder to trade in real time, when the sweep and shift are still forming.
There is no robust independent evidence that trading breakers alone produces an edge. It is one tool inside a tested process, not a signal you can rent.
A breaker block is a potential trade location, not a reason to enter by itself. Its usefulness depends on a clear definition, supporting context, and disciplined risk management.
It can fail, and it does fail, like any pattern in any market.
SMC is interpretation, not confirmed order flow. There are no guaranteed outcomes. Consistent screen time on a simulated account, with a journal, is the only realistic way to find out whether this concept fits how you actually trade.
Practising Breaker Blocks Before You Risk Capital
A discretionary concept only becomes useful with screen time.
Start by marking potential breaker blocks on historical or live charts, then test the setup on a demo or simulated account before committing real money. Journal each setup and record whether the liquidity sweep, structure shift, retest, and invalidation were clear before the trade.
If you want a simulated environment, Audacity Capital offers a Free Prop Firm Trial that lets traders use MT5 or DXTrade at no cost.
If you later pursue a funded account, remember that an evaluation involves its own rules and costs. A funded evaluation should be treated as a separate financial decision, not as proof that the trading strategy works.
The goal is not to collect winning examples. It is to see whether you can identify the same setup consistently in real time.
Frequently Asked Questions
An order block is a zone traded with the original impulsive move. A breaker is a failed order block that flips direction after a liquidity sweep and structure shift. It is then traded on the retest: same origin candle, opposite intent.
Both exist. A failed bearish order block becomes a bullish breaker that can act as support on the retest. A failed bullish order block becomes a bearish breaker that can act as resistance. The label describes which side the flip favors, not the pattern itself.
They are a discretionary tool, not a proven mechanical edge. Some traders use them successfully within a tested process with strict rules and risk management. Definitions vary, results are subjective, and most retail traders lose money, so treat breaker blocks as one input rather than a signal.
There is no single best timeframe. Many SMC traders set bias on a higher timeframe, such as the 4-hour or daily chart, then refine entries on lower timeframes like the 15-minute or 5-minute. Lower timeframes offer more setups but also more noise. Choose the combination that fits your market and trading style.
The strict ICT breaker requires a liquidity sweep before the order block fails. A mitigation block is a failed order block without that sweep, where price simply returns to the zone. Usage varies across educators, so the practical rule is to define which version you mean and apply it consistently.
A common approach is to place the stop just beyond the far side of the zone: below a bullish breaker, above a bearish breaker. The logic is that a hit means the zone truly failed, not that price wicked through normal noise. Exact placement depends on volatility and the market you trade.
Yes. Breaker blocks can be applied to forex, indices, and crypto. Volatility, session behavior, and wick sizes vary by market, so adjust zones and stops to the instrument. Test the setup on each market rather than assuming the same rules will transfer.
They are a specific, rules-based support and resistance flip built on order-block logic and a confirmed structure shift. Related to horizontal support and resistance, but not the same as drawing a plain line across obvious highs and lows. The added conditions are what distinguish the concept from ordinary support and resistance.

¿Listo para aplicar un riesgo disciplinado a las criptomonedas? Explore los nuevos instrumentos de cripto de Audacity Capital y traiga su estrategia de trading.
Aprender másBoletín
Únase a nuestro boletín para mantenerse al día.
Únete a Nuestra Comunidad Social

Comienza Tu Viaje Hoy Con Nuestra Prueba Gratuita
Muestra con orgullo tus habilidades y logros a través de certificados y obtén reconocimiento por tu arduo trabajo y dedicación de posibles inversores y compañeros.
Prueba GratuitaArtículos Relacionados
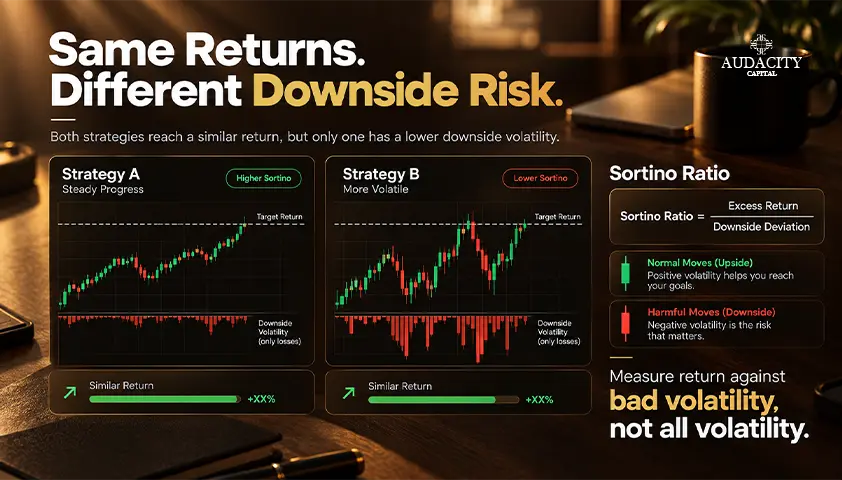
Sortino Ratio in Trading: How It Measures Downside Risk
Learn what the Sortino Ratio means, how to calculate it using downside deviation, and how traders use it to compare risk-adjusted performance.


Bearish RSI Divergence: How to Spot It, Confirm It and Trade It
Learn how to identify bearish RSI divergence, confirm reversal signals, plan entries and exits, and manage risk with practical forex trading examples.

Maximum Favorable Excursion: How MFE and MAE Read a Trade
Learn how Maximum Favorable Excursion and MAE reveal a trade's best and worst open moves, exit giveback, and possible entry or exit problems.

Bullish RSI Divergence: How to Spot, Confirm and Trade It
Learn how to identify bullish RSI divergence, confirm reversal signals, choose entries, set stop losses, and manage risk effectively.