


Order Blocks in Trading: A Complete Guide


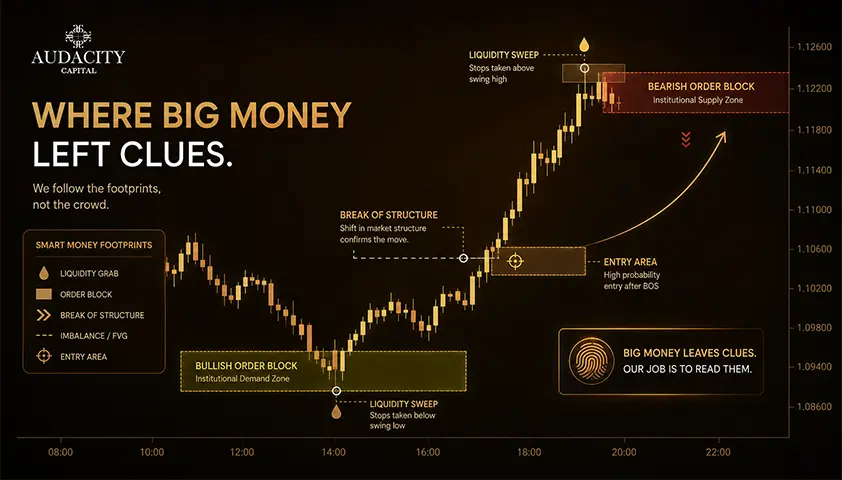
An order block is the last opposite-direction candle before a strong, impulsive move, and traders use that candle's range as a high-probability zone to enter when price returns to it.
In a rising market, that means the last down candle before a sharp rally.
In a falling market, it means the last up candle before a sharp drop. Simple to define. Much harder to trade well.
The problem is that you can mark something that looks like an order block on almost any chart you open. Most of those markings are noise.
The edge does not live in the pattern itself. It lives in the validation filters that separate a real, tradable zone from a random last-opposite candle, and in how you combine order blocks with the rest of the toolkit.
Here’s what we will cover today:
- what an order block is,
- how it forms,
- how to identify bullish and bearish versions,
- the six filters that qualify a valid zone,
- three trade setups with entry and stop mechanics,
- stop-loss and sizing discipline,
- how to combine order blocks with fair value gaps and market structure,
- the best timeframes and markets,
- what changes when you trade them under prop firm rules,
- and common mistakes
Throughout the guide, the framing stays practical and probability-based. Order blocks fail regularly, and no location tool changes that.
What is an order block?
An order block is the last opposite-direction candle before a strong impulsive move on a chart. That is the working definition, and it splits into two cases.
A bullish order block is the last bearish (down) candle before a strong up-move. A bearish order block is the last bullish (up) candle before a strong down-move.
You draw a zone around that single candle and watch how price behaves when it comes back.
The modern vocabulary here comes from Michael Huddleston, better known as the Inner Circle Trader (ICT), whose work popularized order blocks as part of a wider Smart Money Concepts (SMC) framework.
The underlying idea is older, though.
Traders have marked institutional-style supply and demand zones for decades. ICT gave the concept a tighter, candle-based definition and connected it to related tools.
The theory traders attach to order blocks goes like this: they assume unfilled institutional orders remain in that candle's range, so when price returns, those resting orders push it away again.
Treat that as a widely believed narrative among discretionary traders, not as verified fact. An order block is a pattern people trade because it works often enough to be useful, not an X-ray of any bank's order book.
How order blocks form? The psychology and the mechanics
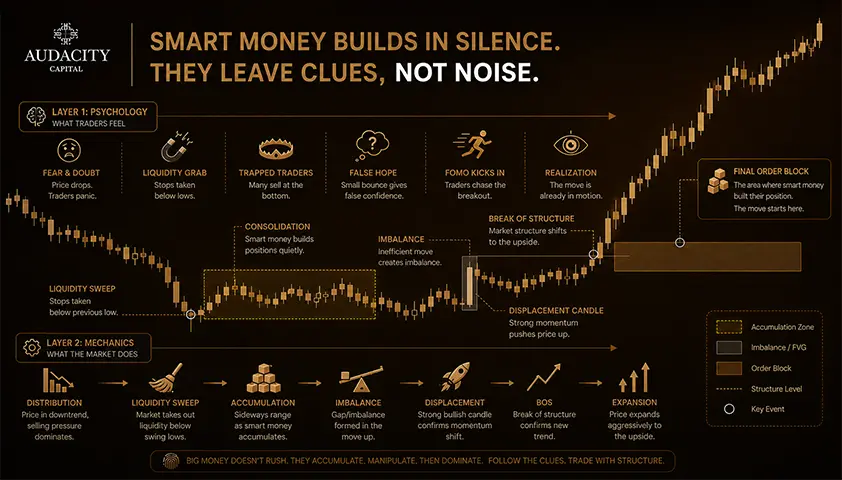
The formation story matters, because it tells you which zones are worth trusting.
Price is moving in one direction. One side of the market gets exhausted or stopped out. A large participant, or a cluster of them acting together, commits size in the opposite direction inside a single candle's range.
Price then moves aggressively in the new direction, a burst known as displacement, leaving that last opposite candle behind as a footprint.
When price later returns to that zone, the assumption is that residual buying or selling interest still sits there, so the zone can act as support or resistance.
That is the mechanic traders rely on when they place a retest entry.
But keep the caveat in view. This is a plausible narrative that many traders find useful, and the pattern itself is real and observable on any liquid chart.
Whether specific institutions actually placed orders inside that exact candle is theory, not something anyone can confirm from a price chart. Trade the pattern because it is repeatable, not because you believe you are reading a bank's intentions.
How to identify an order block on a chart?
Identification is where most beginners get it wrong, usually by marking the swing high or low instead of the correct candle.
Below are the two directional cases and then the validation filters that decide whether a zone is worth trading at all.
1. Bullish order block
A bullish order block is the last bearish (red) candle immediately before a strong impulsive up-move. You draw the zone from that candle's open down to its low.
Some traders include the full wick, others draw open-to-close only for a tighter zone. Both conventions are common, so pick one and stay consistent.
Traders use bullish order blocks to look for long entries on the retest, expecting residual buying interest in the zone to push price back up.
The important point: the order block is the candle immediately before the displacement, not the candle at the swing low. Mark the last down candle before the rally, not the lowest point of the move.
2. Bearish order block
A bearish order block is the mirror image: the last bullish (green) candle immediately before a strong impulsive down-move. You draw the zone from that candle's open up to its high.
Traders use bearish order blocks to look for short entries on the retest. The same last-opposite logic applies, just inverted.
Do not confuse a bearish order block with the swing high itself. It is the last up candle immediately before the drop, not the peak of the move.
What makes an order block valid? The 6 filter checklist
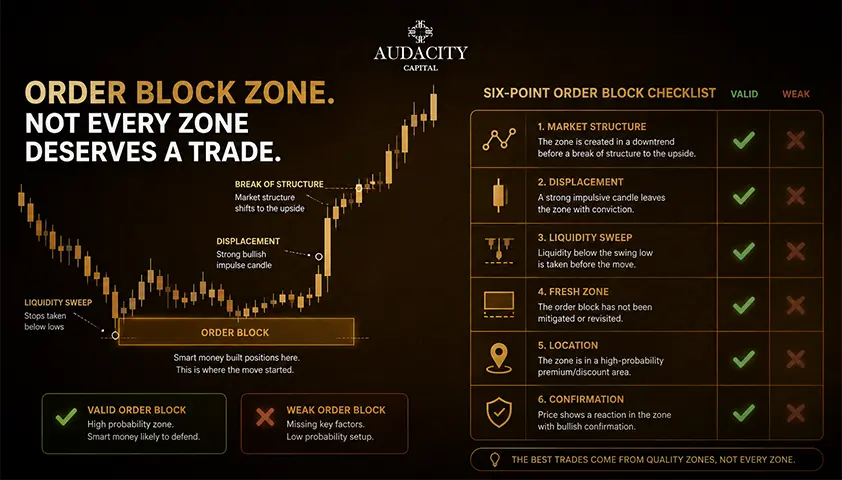
Marking every last-opposite candle as a tradable zone is the fastest way to lose money with this concept.
Run each candidate through these six filters.
1. Strong displacement.
The move that follows must be genuinely impulsive: large-bodied candles with sustained direction, not a tepid few-pip drift. Weak follow-through means a weak zone.
2. Break of structure.
That impulsive move must break a prior swing high or low, a break of structure (BOS). An order block with no following BOS is unconfirmed. The break is the evidence that the move meant something.
3. Structural context.
The zone should sit at or near a higher-timeframe reference: a higher-timeframe order block, a fair value gap, a session high or low, or a prior swing. A zone floating in the middle of nowhere is weaker.
4. Elevated volume.
Where volume data exists, such as futures and stocks, the displacement should show volume above recent averages. This confirms real participation behind the move.
5. Unmitigated zone.
The order block should not already have been traded back into the current leg. A zone that price has already returned to has likely done its job.
6. Higher-timeframe alignment.
An order block that agrees with the higher-timeframe trend is worth more than one fighting it. Continuation zones beat counter-trend zones on average.
A useful practical filter on top of these is the four-candle rule: if price has not returned into the order block by roughly the fourth candle after formation, the setup is more likely to hold on the eventual retest. It is a probability filter, not a promise.
How to trade an order block? Entry, stop, and target
Here are three setups, from aggressive to advanced. Treat every entry, stop, and target rule here as an illustrative starting point. The right values depend on your timeframe, market, and volatility, so backtest them before you risk anything live.
Setup 1: Aggressive retest entry
This is the classic approach and the core of any order block trading strategy.
Once you have identified and validated a zone, place a pending limit order at the near edge of the order block in the direction of the original impulse: the top of the zone for a bullish order block, the bottom for a bearish one.
Your stop goes beyond the opposite edge of the order block. Some traders extend it further, past the swing that created the impulse, for more breathing room.
Target the prior swing high or low, the next liquidity pool, or a fixed reward multiple with a minimum 1:2 floor.
The tradeoff: aggressive entries fill more often, but they also take more losses when a zone fails, because you are in before price shows you anything.
This setup suits higher-timeframe order blocks with strong validation, where the odds justify entering blind.
Setup 2: Conservative confirmation entry
This is the lower-timeframe refinement, and it is where most disciplined traders end up.
Instead of a pending order, you wait for price to trade into the zone and then print a confirming candle on a lower timeframe, typically the 5-minute or 15-minute.
For a bullish order block, that could be a bullish engulfing candle, a pin bar, or a small break of structure to the upside inside the zone. For a bearish order block, look for the mirror.
Enter on the close of that confirming candle. Place your stop beyond the low or high of either the confirming candle or the order block, whichever is further away. Targets follow the same logic as above.
The tradeoff: you will miss some fast reactions that never wait for confirmation, and your average reward per trade drops slightly. In exchange, your average setup quality rises. This suits lower-timeframe zones and volatile markets where a pending order gets picked off too easily.
Setup 3: The breaker block and mitigation block reversal
This is the reversal variant, and it belongs to more experienced traders.
A breaker block is an order block that has failed: price closed straight through it in the opposite direction, so its polarity flips. A former bullish order block that gets broken becomes a resistance zone, and a former bearish order block that gets broken becomes a support zone.
A mitigation block is a related idea, where price runs deep into a prior order block before reversing away from it.
Traders retrade these flipped zones on the retest, entering in the new direction with tighter stops and, ideally, a confirmation candle. Reversals against the recent trend are lower probability than continuation with it, so the confirmation matters even more here.
One point worth stating plainly: this is an advanced variant. If you are still learning to identify clean bullish and bearish order blocks, start there.
Add breaker blocks and mitigation blocks to your process only once the standard setups are consistent for you.
Stop-loss, take-profit, and position sizing for order block trades
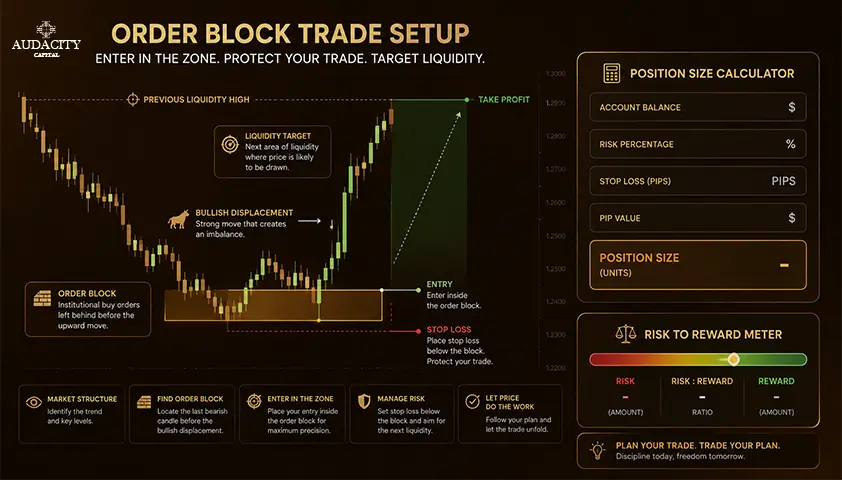
This section decides your results more than zone selection does. A good order block with a bad stop or an oversized position is still a losing trade over a real sample.
1. Stops
They go beyond the opposite edge of the order block, or beyond the swing that created the impulse, whichever is further.
The point is that your stop is hit only when the setup is genuinely broken, not when price wobbles around inside the zone as it often does.
A stop placed too tight inside the zone gets taken out by normal noise before the trade can work.
2. Targets
They are usually the prior swing high or low, the next visible liquidity pool, or a fixed reward multiple with a common minimum of 1:2 risk-to-reward.
Many SMC traders scale out a portion at 1:2 and leave a runner aimed at higher-timeframe liquidity, which locks in some results while keeping exposure to a larger move.
3. Position sizing
This is a function of your stop distance and your account risk, never the width of the zone. A common discipline, and one that maps well to funded-account rules, is risking 0.5 to 1 percent of equity per trade.
You calculate your position size backward from where the stop sits, so a wider order block simply means a smaller position, not more money at risk.
Combining order blocks with fair value gaps, market structure, and liquidity
A standalone order block is a low-quality signal. A zone that lines up with the rest of the SMC toolkit is where probability actually improves.
Here are three combinations worth building your process around.
1. Order block plus fair value gap.
The strongest entries usually sit where a fair value gap (FVG), a three-candle imbalance inside the impulsive move, forms within or right next to an order block in the same direction.
The FVG marks the displacement, the order block marks the origin, and price often returns to both together.
When those two zones overlap, you are trading at a location that two independent SMC methods both flag.
2. Order block plus break of structure or change of character.
An order block is only confirmed once the move that followed it broke a structural level.
In a downtrend, a bullish order block needs a change of character (CHoCH) to the upside, an early shift where price breaks a recent counter-trend swing, before it becomes worth trading. Without that structural signal, you are guessing at the bottom.
3. Order block plus liquidity sweep.
An order block that forms right after a liquidity sweep, where price briefly runs past a prior swing high or low to trigger stops before reversing, tends to be higher probability.
The sweep provides the fuel for the impulse, so the resulting zone often has real intent behind it.
Tie it together with the higher-timeframe rule: identify the order block on the 4-hour or daily chart for bias and location, then refine your actual entry down on the 15-minute or 5-minute.
Note: Treat all of these as widely used discretionary methods, not as proven institutional truth.
Best timeframes and markets for order block trading
The concept works on any liquid market: forex majors, index and commodity futures, large-cap crypto, and large-cap stock intraday. It also works on any timeframe from the 1-minute up.
That said, higher timeframes produce cleaner zones because they filter out noise, so 1-hour, 4-hour, and daily order blocks tend to be more reliable than anything faster.
A common working structure is to mark your order blocks on a higher timeframe, the 4-hour or daily, for bias and location, then drop to a 15-minute or 5-minute chart to refine the entry.
This gives you the reliability of the higher-timeframe zone with a tighter, better-priced entry.
A warning worth taking seriously: order blocks on 1-minute charts and in thin, illiquid markets whipsaw badly.
That is not where a newer trader should be learning this. No timeframe is more profitable in itself. Higher timeframes are simply cleaner, and cleaner is where you want to start.
Common mistakes traders make with order blocks
A short checklist of the errors that cost most traders the most:
- Marking the swing high or low instead of the last opposite-direction candle before the impulse.
- Treating every last-opposite candle as tradable, with no validation filters applied.
- Ignoring the break of structure, so entering zones that were never confirmed.
- Placing stops inside the zone, where normal noise takes them out before the trade works.
- Fighting the higher-timeframe trend with a low-timeframe counter-trend order block.
- Oversizing on wide zones by using a fixed lot size instead of sizing to the stop.
Conclusion
An order block is the last opposite-direction candle before a strong impulsive move, and traders use those zones as high-probability locations for continuation entries, or, when the zones flip, for breaker-block reversals.
That is the whole concept.
The part worth remembering is that most last-opposite candles are not tradable zones.
The edge comes from the validation filters, the break of structure, the displacement, the structural context, the higher-timeframe alignment, and from combining order blocks with fair value gaps and liquidity sweeps. It does not come from the pattern alone.
Practically, that means picking fewer and better zones, waiting for confirmation before you commit, keeping stops beyond the zone rather than inside it, and sizing for the stop instead of the pattern.
Get that process consistent, and the next real test is trading it somewhere the rules and stakes actually matter. Audacity Capital's free competition and Funded Trader Program are a natural place to pressure-test a disciplined price-action approach under genuine constraints.
FAQ
A support-resistance level is any horizontal price where a chart has reacted before, regardless of how price got there. An order block is a specific candle-based zone: the last opposite-direction candle before an impulsive move that broke structure. Order blocks are a subset of what a discretionary trader would call support or resistance, but with much tighter identification rules.
No. Most last-opposite candles fail. Only zones that pass the validation filters, confirmed break of structure, real displacement, and higher-timeframe alignment, hold with any meaningful edge. Treating every order block as tradable is the single biggest mistake beginners make.
An order block is a candle-based zone, the last opposite candle before an impulse. A fair value gap is a three-candle imbalance inside the impulse itself. They often overlap, and the strongest SMC entries usually sit where an order block and a fair value gap coincide.
A breaker block is a failed order block that price has closed through in the opposite direction. Its polarity flips, and it becomes a reversal zone in the new direction. A regular order block is used for continuation trades, while a breaker is used for reversal trades and typically needs stronger confirmation.
Yes, the same last-opposite-candle logic applies in any liquid market. Crypto is more volatile, though, and needs wider stops, while stock order blocks formed by overnight gaps behave differently from intraday ones and should be treated separately.
Some traders use the four-candle rule: if price has not returned into the zone within roughly four candles of formation, treat the setup as more likely to hold on the eventual retest. It is a filter, not a guarantee, and higher-timeframe order blocks often take much longer to be tested.
Yes. The last-opposite candle before an impulse is a real, observable pattern that any price-action trader can spot. The Smart Money Concepts and ICT vocabulary just gives it a name and connects it to related ideas like fair value gaps, break of structure, and liquidity.
No. Order blocks are a probability location tool, not a guaranteed signal. Even a well-validated zone fails regularly, which is exactly why stop discipline and position sizing matter more than any single zone you mark.

Pronto para aplicar risco disciplinado em cripto? Explore os novos instrumentos de cripto da Audacity Capital e traga sua estratégia de trading.
Saiba MaisNewsletter
Junte-se ao nosso boletim para ficar atualizado.
Junte-se à Nossa Comunidade Social

Comece Sua Jornada Hoje Com Nosso Teste Gratuito
Mostre com orgulho suas habilidades e conquistas através de certificados e obtenha reconhecimento pelo seu trabalho árduo e dedicação de potenciais investidores e colegas.
Teste GratuitoArtigos Relacionados
Inside Bar Pattern: Meaning, Examples and Trading Rules
Learn how to identify the inside bar pattern, compare entry and stop rules, and assess false breakouts before testing a trading strategy.


Trade Deficit Explained: Causes, Effects and Markets
What a trade deficit is, what actually causes it, why it can widen in a strong economy, and why the textbook currency rule often fails.

Best Trading Simulator Apps in 2026: Practice Trading Risk-Free
Compare the best trading simulator apps in 2026 for stocks, forex, futures and crypto. See features, markets, realism, pricing and beginner-friendly options.
GTC in Trading: What Good Till Cancelled Orders Mean and How to Use Them Properly
Learn what GTC means in trading, how Good Till Cancelled orders work, when to use them, and the risks of leaving pending orders active.